Using webSlinger as a Scraper
Scrape straight to your clipboard
webSlinger's free Scraper tier turns the extension into a point-and-click scraper. Open any page, switch on an overlay, tick the data you want, and it is copied to your clipboard — no recording a session, no generating a script, and no paid subscription.
It works on the page you are already looking at, in your real browser, with your existing login and cookies — so data behind a normal sign-in is fair game.
What's free vs. paid: Scraping to the clipboard is included free on the Scraper tier. Saving session maps, generating automation scripts, and running automations require a paid plan.
Step by Step
The scraping workflow
- Go to the page you want to scrape and activate the webSlinger extension on it (click the extension icon in your browser toolbar).
- Turn on an overlay: click for the data-extraction overlay (individual fields), or for the array-extraction overlay (a repeating list or table).
- Right-click inside a highlighted bounding box — or on an index label, when extracting an array — and tick the checkboxes for the data you want.
- The scraped data appears in the validation log and is copied to your clipboard automatically.
- When you are finished, deactivate the extension and close the main browser tab. The validation and copy tabs close automatically when webSlinger is deactivated.
Extract vs. Array
Two overlays, two jobs:
- Extract — pulls individual fields. Use it for one-off values like a price, a title, or a description.
- Array — pulls a repeating structure. Use it for lists, tables, or search results where every row has the same fields. See Array Extraction for how to target the right one.
Array Extraction
Reading the index labels
When you turn on the overlay, webSlinger marks every repeating instance — a card, a record, a row — with an index label. The same instance can belong to more than one array: a product card might be one item in the page's "search results" array while also containing its own "specifications" array. So a single box often shows several index labels at once.
Each array is told apart by three cues:
- A color — every instance of the same array shares one color.
- An array number in brackets, e.g.
[1],[2]— which array the label belongs to. - A sequence label like
1/10,2/10— this instance's position and the total instance count for that array.
To target the array you want, find the index tags that share the same color and array number.
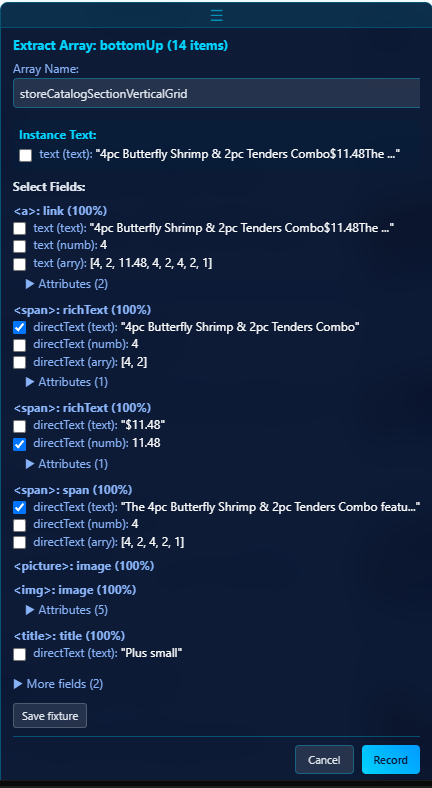
A worked example
![Array overlay on a Popeyes Combos menu: a green [22] label on the Combos heading, plus blue [9] and pink [25] index labels on each combo card.](ArrayExtraction.png)
Each combo card carries two index labels, and the category heading carries a third:
- Green
[22]on the Combos heading — the category-names array. “Combos” reads3/11, so the menu has 11 categories. - Blue
[9]on each card — the items in this category. They run1/14through4/14, so Combos has 14 items. - Pink
[25]on each card — every item on the menu. They run1/68,2/68…, so the full menu has 68 items.
Every card belongs to both the blue [9] Combos array and the pink [25] whole-menu array at once. Right-click the blue label to scrape just the Combos category; right-click the pink label to scrape the entire menu — the instance count (14 vs. 68) confirms which one you have.
Picking the right array
Best practice is to right-click directly on the index label rather than elsewhere in the box. When the context menu opens, check that the instance count matches what you expected — chasing the 14 Combos from the example above, the count should read 14, not 68. If it's off, you've likely landed on a different array nested in the same box; close the menu and choose the index label with the right color, number, and count.
Then tick the checkboxes for the fields you want — here, the title, numeric price, and description — and webSlinger captures them across every instance.
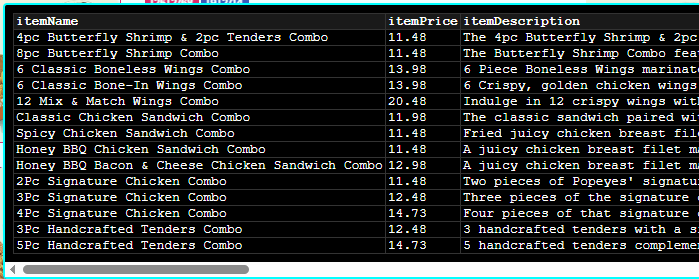
The captured data appears in the validation log and is copied to your clipboard. Hover a validation-log entry to preview the full extracted array:
Not sure what a field choice means? The Anatomy of a Website guide explains the structure behind the checkboxes — what each field maps to on the page.
API Discovery
Grab data straight from the source
Some of the richest data on a page never appears as text — map pins, search results, prices, and listings are delivered as JSON by background API calls. API Discovery captures those calls and pulls the data straight from the feed, including data conventional extraction can't reach (map markers, chart points, anything with no selectable text). It's included free on the Scraper tier.
How to use it
- Activate the extension on the page, then perform the action that loads the data you want — run the search, open the category, scroll the list, load the map. That triggers the API calls webSlinger captures.
- Click the button in the toolbar to open the captured-calls panel. It lists the JSON requests the page made, grouped by method and URL — use the filter box to narrow them down.
- Click the call whose response holds your data (the panel hints: “Click a call to extract fields from its response.”).
- In the Pick fields to extract view, tick the fields you want. webSlinger shows the response's structure so you can choose exactly what to capture.
- Click . webSlinger replays the call to confirm it works, then drops the extracted rows into the validation log and your clipboard — the same place your Extract and Array results land.
Reach for API Discovery when Extract and Array come up empty — if a result is drawn as a map marker, a chart point, or a dynamically positioned element with no readable text, the data still exists in the API response. See API Discovery in Key Features for more on why this works.
From the Tutorial
Which parts apply to the Scraper tier
The Basic Tutorial walks through webSlinger end to end. On the Scraper tier, focus on these parts:
- Navigation — applies. Getting to the page and moving around it is the same.
- Extraction — applies. This is the / workflow described here.
- Input — works, but isn't useful on the Scraper tier. Filling inputs is part of recording a session map, and saving session maps requires a paid plan.
The script-generation and execution sections of the tutorial require a paid plan — on the Scraper tier, stick to the navigation and extraction portions.