Getting Started
What is webSlinger?
webSlinger is a browser extension that captures human web navigation and transforms it into reliable automation. It uses a real-time validation system to ensure your automations work correctly before you run them.
Teach Your Browser Like You'd Teach a Person
You teach a person how to do a task by showing them. Think of webSlinger the same way. You demonstrate an example or two, then ask it to finish the rest of the work on its own. To make sure it understands what to do, you have it duplicate your actions. You get instant validation that it can navigate, fill forms and extract data by watching it copy you.
In this tutorial, you'll learn how to demonstrate:
- Navigation
- Input actions (forms, search boxes, dropdowns)
- Data extraction from web pages
- Array extraction for tables and lists
- Saving the session map (the record of what you did and how to repeat it)
Before You Begin: Setup
1. Pin webSlinger to Your Toolbar
Make sure the webSlinger icon is easily accessible in your browser toolbar.
Click the puzzle-piece icon  in your browser toolbar to open the extensions panel:
Then click the pin icon next to webSlinger to pin it to your toolbar:
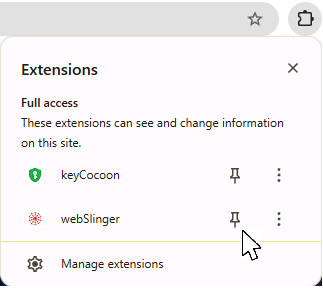
Now the webSlinger icon will be on the taskbar.

2. Configure Your Settings
Right-click on the webSlinger icon and click Settings.
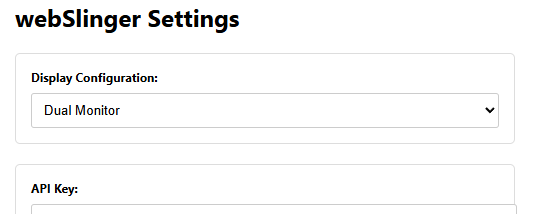
3. Select Display Configuration
In Settings, choose either:
- Side by Side - Both main and validation tabs in one window (recommended for single monitor setups)
- Dual Monitor - Tabs in separate windows (recommended for dual monitor setups)
After configuring, close the Settings panel. You'll be able to watch as webSlinger duplicates your actions!
The Three-Tab System
webSlinger uses three tabs with different purposes to ensure automation reliability:
Where you perform actions
Where webSlinger replicates those actions programmatically
Tests direct navigation
Why three tabs? The main tab is where you perform actions manually. The validation tab immediately replicates those actions programmatically - exactly as they would be executed in an automation. This gives you instant feedback on whether your selectors will work reliably. The third tab tries to navigate directly using the url for each main-tab state. If it is successful, the state is called an anchor state. In this tutorial we will focus on the main tab and the validation tab.
Try It: Activate webSlinger
Let's see the three-tab system in action!
- Click on the webSlinger icon in your browser toolbar
 it should be inactive(red)
 - Two windows will open:
- One with the Main tab (showing this tutorial)
- One with the Validation tab (also showing this tutorial)
The Copy tab is placed in the same window as the main tab, also showing this tutorial
- An overlay will appear in the upper-right corner of the Main tab
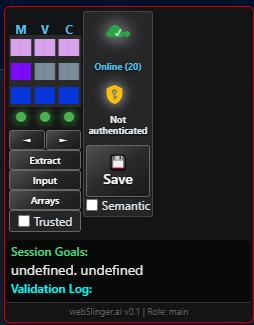
Understanding the State Signature Grid
Once webSlinger is activated, you'll see a colorful grid in the overlay. This is the State Signature Grid - it shows you the current state of each tab using unique color patterns.
State Signatures: Each web page generates a unique visual representation of its state using three different algorithms that respond to different properties of the webpage. These properties can change as you interact with a site. When at least two of the squares match between the main and validation tabs it is highly likely that real-time validation will be successful.:
- URL State - Based on the page URL including query parameters.
- Structure State - Based on the page's overall composition - how many elements, buttons, forms, and links are present.
- Interaction State - Based on what you can actually interact with on the page.
These states are continually monitored for each tab, providing immediate feedback when something changes and also helps determine when a page has stabilized following an interaction. The columns of the state grid correspond to the three tabs.
- M = Main tab state
- V = Validation tab state
- C = Copy tab state
When navigating, note how the patterns change. The structure state (middle row) is most sensitive and will often not agree even when the tabs look identical. So long as the other two states agree your validation should work. If the validation tab and main tab get visually out of sync, clicking the refresh button on the main tab will bring them back to the same state.
Stability Indicators
You'll also see stability indicators below the state signature grid. These indicate when a tab can be considered stable.
- ● - Page is stable and ready for interaction
- ● - Page is still loading or changing
Navigation Exercise
Now it's time to experience real-time validation in action. Click the button below to start a 5-page navigation sequence. Watch carefully as:
- The state signatures change - Each page has different DOM structure, creating unique color patterns
- The validation tab follows instantly - Your clicks are replicated programmatically in real-time
- The stability indicators update - Watch them change from yellow to green and back as pages load
- The validation log records each action - Every action is logged and shown in the overlay, colored green if successful or red if there was a problem Note that if you click in the validation tab instead of the main tab, the validation tab will navigate on its own and your tabs will become out-of-sync. Click the refresh button in the main tab to re-sync the tabs.
Input Actions
Introduction to Input Actions
Input actions allow you to automate form filling, searches, selections, and button clicks. webSlinger validates each input action in real-time to ensure it will work reliably in automation.
Input Overlay Features
Once the input overlay is activated, you'll notice:
- Colored boxes around input fields, buttons, dropdowns, and other interactive elements
- Boxes scroll smoothly with the page content
- Different colors for different element types
Try It: Checkbox Selection
Let's practice recording a checkbox action:
Preferences Demo
- Right-click on any checkbox above
- In the context menu, choose to set the checkbox state (checked or unchecked)
- Click Record
- Watch as the checkbox state is set to your choice in BOTH the main tab and the validation tab
- Try different checkboxes and states
- Check the validation log - you'll see each checkbox action recorded!
- Note: clicking on the checkbox directly will also work to toggle the checkbox. But for an automation it is better to set the state rather than depend on it initially being in one state or the other.
Try It: Dropdown Selection
Now let's try recording a dropdown selection:
City Selection
- Right-click on the dropdown above
- Leave the selection method set to option text
- In Target selection, select a city from the menu
- Click Record
- Watch as the selection is mirrored in the validation tab
- The city information appears in both tabs simultaneously
- Check the validation log for the recorded action
Try It: Paste Action and Button Click
Let's fill a form and record a button submission:
Form Submission
- Right-click on the input field above
- Type in a name and click Record
- Right-click on the Submit button
- Click Record in the context menu
- Note how the form responds in BOTH the main and validation tabs
- Check the validation log - both actions are recorded!
Real-Time Validation: Every input action you perform is immediately replicated programmatically in the validation tab. If it works there, it will work in your automation!
Data Extraction
Introduction to Data Extraction
Data extraction allows you to capture specific data from web pages - prices, names, dates, descriptions, or any other information.
Extraction Overlay Features
With the extraction overlay active:
- Boxes highlight potential data sources
- Boxes scroll with page content perfectly
- Right-click any box to see extraction options
- Preview the exact data (white text or tooltip) that will be extracted
- If an index obscures the data, look in the validation tab or toggle the overlay
Try It: Extract Product Information
Wireless Noise-Canceling Headphones
Price: $299.99
Rating: 4.5 / 5.0 (2,847 reviews)
Stock: In Stock
SKU: WH-1000XM5-B
Description: Premium wireless headphones featuring industry-leading noise cancellation, exceptional sound quality, and all-day comfort. Perfect for travel, work, or enjoying your favorite music.
Practice extracting different elements:
- Right-click on the product price above
- You'll see extraction options:
- direct-text - Just the text content ("$299.99")
- text - All text including children
- numeric - Convert to number (299.99)
- attribute values - Like data-price, id, class, herf, etc.
- Select direct-text or numeric
- The extractable value appears in white or in a tooltip if truncated
- Check the validation log - you'll see the extracted value. Real-time validation!
Extraction Options Explained
Text Extraction Types:
- direct-text - Only the immediate text of the element (best for clean extraction)
- text - All text content including child elements
- numeric conversion - Automatically parse numbers from text
Attribute Extraction:
You can also extract attribute values from elements:
- href from links
- src from images
- data-* custom attributes
- class, id, or any other attribute
Parent Element Extraction:
Sometimes the data you want is in a parent element. You can extract text from:
- Parent element
- Grandparent element
- Great-grandparent element
Example use case: Merging multiple paragraph elements into a single output by extracting from their common parent container.
Try It: Grandparent Text Extraction
— Lao Tzu
Try extracting this famous quote:
- Right-click on any colored phrase in the quote above
- Select direct-text - you'll only get that one phrase
- Now right-click on the same phrase again
- Select grandparent text - the text is truncated, so mouse over it to see the tooltip with the complete quote
- Click to extract the full quote
- Check the validation log to see the difference between the two extractions
Why this matters: Many websites split content across multiple elements for styling. Grandparent extraction lets you capture the complete text in a single extraction, which is much more useful than getting fragments.
-----Toggle off the extraction overlay so you can click on the button to continue.-----
Array Extraction
Introduction to Array Extraction
Array extraction captures repeating data patterns - like tables, lists, search results, or product listings. Instead of extracting one item at a time, you can capture entire datasets in a single action.
Try It: Extract Product Listings
Search Results: Laptops
| Product | Price | Rating | Stock |
|---|---|---|---|
| UltraBook Pro 15" | $1,299.99 | 4.7 | In Stock |
| Gaming Laptop X1 | $1,899.99 | 4.8 | In Stock |
| Business Elite 14" | $899.99 | 4.5 | Low Stock |
| Budget Laptop S2 | $449.99 | 4.2 | In Stock |
| Creator Station 17" | $2,299.99 | 4.9 | Pre-Order |
Extract the entire table:
- With the array extraction overlay active, right-click on any product row or instance label (e.g. [3] 3/5)
- The instance label has the array index in brackets then the instance index over the number of instances to help you identify which instances belong to which array
- A menu appears allowing you to select which fields to extract (using the first complete instance as example data)
- Choose the data fields you want (product name, price, rating, stock)
- For price and rating, select numeric conversion
- Click Extract Array
- The array data is extracted from all matching instances!
Viewing Extracted Arrays
Check the validation log! When you extract an array, the log entry shows a summary. Mouse over the entry to see a tooltip with the complete extracted array data.
The array is extracted from the validation tab and validated against the array intance clicked on in the main tab.
Array Extraction Use Cases
Common uses for array extraction:
- E-commerce: Product listings, price comparisons, review aggregation
- Job Hunting: Job board search results
- Real Estate: Property listings with prices, locations, features
- Research: Academic papers, citations, data tables
- Finance: Transaction histories, stock prices, portfolio holdings, invoices
- Travel: Flight options, hotel rates, rental car availability
Advanced Array Features
Scrolling Arrays
webSlinger can handle arrays that require scrolling to load more results. Just scroll until you see the end of the array, then toggle the array overlay and extract. In automations, webSlinger will copy this behavior and scroll to the end before extracting the array.
Nested Data
You can extract complex nested structures - for example, product listings where each product has multiple images, multiple price tiers, or multiple attribute options.
Column Selection
Choose exactly which columns you want - you don't have to extract every field. This keeps your data clean and focused on what you actually need.
Saving Session Maps
What is a Session Map?
A session map is a complete record of everything you did during a webSlinger session. It captures:
- Navigation actions: All clicks and page transitions
- Input actions: Form fills, searches, selections
- Extraction actions: Single-item and array extractions
- Page states: State signatures for each page visited
- Action chains: The sequence of actions between anchor states
- Transitions: How pages change in response to actions
- Extracted data: Sample data captured during the session
Why Save Session Maps?
Session Maps -> Automation Scripts
You record your actions in a session map, then webSlinger generates an automation script that can repeat those actions for hundreds or thousands of different inputs.
You record a few examples of extracting the data records you want. webSlinger can generalize to extract all such data records, across multiple pages.
Benefits:
- Reuse the same workflow with different data
- Combine multiple session maps into complex automations
- Edit and refine your automation logic
- Version control your automation processes
How to Save a Session Map
- Click the Save button on the webSlinger overlay (in the main tab)
- Enter a descriptive name for your session map
- Example: "weather-lookup-by-city"
- Example: "amazon-price-check"
- Example: "bank-statement-download"
- Click Save to confirm
- Your session map is saved to the webSlinger server
Try It Now
Since you've navigated through this tutorial and practiced input, extraction, and array extraction actions, you have a complete session map ready to save!
Save this tutorial session:
- Click the Save button in the webSlinger overlay
- Enter a name like "webslinger-basic-tutorial-practice"
- Click Save
Session maps help the script-generation AI translate what to do into how to do it.
Deactivating webSlinger
Once you've saved your session map, you can deactivate webSlinger:
- Click the webSlinger icon in your browser toolbar (it should be green/active)
- The validation and copy tabs will close automatically
- The main tab overlay disappears
- The main tab becomes a normal browser tab again
What Gets Saved?
Your session map includes:
- Input data you provided
- Anchor states
- Complete action sequences
- Robust selectors for every element you interacted with
- Page state signatures (collected for research into improved state validation algorithms)
- Any data you extracted during the session (labeled as sample data)
- Scroll positions
- Action validation results
- Passwords or credentials (see the keyCocoon tutorial for how credentials are managed)
- Personal identifying information (unless you explicitly extracted it)
Next Steps
What You've Learned
You now understand the core concepts:
- Three-tab validation system
- Real-time selector validation
- State signatures and stability indicators
- Navigation, input, and extraction actions
- Array extraction for repeating data
- Saving session maps
Full Workflow Reference
The tutorial above covers the mechanics of recording. To learn about the complete workflow -- writing tasks and goals, generating scripts, configuring input data, running automations, and troubleshooting -- see the How-To Reference.
1. Weather Data Collection Tutorial
Watch this video tutorial that covers the complete automation workflow from start to finish:
- Planning sessions with tasks and goals
- Recording session maps for automation
- Generating automation scripts from session maps
- Creating input data files
- Running automations and reviewing results
Example Project: Weather Data Collection
The video tutorial walks through automating weather lookups on AccuWeather.com:
- Set up session task and goals
- Record navigation and extraction for one city
- Generate an automation script
- Create a list of cities as input data
- Run the automation and collect weather for all cities
You'll build a complete automation from scratch and see results immediately!
2. Amazon Invoice Tutorial Video
Watch this step-by-step tutorial showing how to extract invoice data from Amazon order history using webSlinger:
3. Bank Login with MFA Tutorial
Learn how to automate logins that require credentials and Multi-Factor Authentication:
- Using keyCocoon for secure credential management
- Recording a password login with webSlinger
- Handling TOTP (authenticator app) verification codes
- Navigating post-login pages to reach your target data
4. Try a Real Automation
Ready to automate something real? Check out the Tutorial Library in the Automation tab for ready-to-run automation scripts. Just download and customize the inputData template. Then launch the automation.
Or pick a simple, repetitive task you do regularly and automate it on your own:
Beginner
Product Price Tracker
Check prices on 3-5 products you're interested in buying
Intermediate
Job Search Aggregator
Compile job listings from multiple job boards
Advanced
Financial Data Collection
Download statements or invoices from multiple accounts
5. Explore Advanced Features
Once you're comfortable with the basics, explore more advanced capabilities:
- Array Extraction: Extract entire arrays with just a few clicks
- keyCocoon Integration: Secure credential management for automated logins
- Multi-Factor Authentication: Handle multi-factor authentication
- Dual Tab Workflows: Coordinate actions across multiple tabs
- Advanced Generalization: Provide a few examples and watch webSlinger generalize to complete workflows
- Scheduling: Run automations automatically on a schedule
Need Help?
Resources available to you:
- Documentation: Detailed guides on every feature
- Video Tutorials: Step-by-step walkthroughs
- Support: Send us feedback if you get stuck