How webSlinger Records Automation
A Different Approach to Web Automation
Most automation tools work in a single pass: you click, the tool records a selector, and you hope it works later. If the selector is fragile or the page loads differently next time, you discover the problem during execution.
webSlinger takes a fundamentally different approach. Instead of recording in one tab and hoping for the best, webSlinger uses three independent browser tabs that work together in real time to capture, validate, and optimize your automation as you record it.
The Three Tabs
When you start a recording session, webSlinger opens three tabs that each serve a distinct purpose:
This is where you interact with the website normally. webSlinger quietly captures your clicks, form fills, and navigation while you work.
While you browse, this tab independently replays your actions to confirm that webSlinger can reliably reproduce what you did. You get real-time confirmation that each step was captured correctly.
This tab tests whether each page you visit can be reached by its URL alone. When it can, webSlinger marks it as a shortcut so your automation scripts can skip unnecessary navigation.
Why This Matters
Validated Before You Finish
Every action is validated as you record. Problems surface immediately, not days later when you run the script.
Instant Feedback
Selectors are prepared proactively, so validation happens in real time. Recording feels natural, not like waiting for a slow tool.
Smarter Scripts
Automatic shortcut detection means your scripts navigate directly to pages when possible, skipping redundant clicks.
Runs in Your Browser
Because webSlinger runs as a browser extension in your real browser, it maintains your login sessions, cookies, and device fingerprint. Sites see a real user, not a bot.
Real-Time Validation
The Problem with Record-and-Pray
Traditional automation recorders capture a single selector for each element you click. If the website changes its layout, class names, or element IDs after you record, your script breaks. You only discover this when you run the script, which might be days or weeks later.
Worse, most tools generate selectors after you click, which adds noticeable delay to the recording process. You click, wait for the tool to catch up, then click again.
How webSlinger Validates in Real Time
webSlinger's validation tab doesn't just record what you did. It independently replays your actions in a separate browser context to prove that the generated selectors actually work.
This means issues are caught during recording. If a selector can't reliably find the element you clicked, you'll know immediately instead of discovering a broken script later.
Why It Feels Instant
webSlinger prepares selector data proactively. Rather than waiting for you to click and then scrambling to generate selectors, the system has already done the analysis before you interact. When your click happens, the response is nearly instantaneous.
Traditional Approach
- User clicks element
- Tool analyzes the page
- Tool generates a selector
- Tool stores the selector
- Feedback shown after a delay
webSlinger Approach
- Page analysis happens proactively
- User clicks element
- Selectors generated instantly
- Validation tab confirms they work
- Feedback shown in real time
Resilient Selectors
Why Selectors Break
A selector is how an automation script finds an element on a page, like "the button with ID submit-btn" or "the third link inside the navigation menu." Most automation tools generate one selector per element. If that selector breaks because the website changed a class name or rearranged its layout, the entire script fails.
This is the number one reason automation scripts stop working. A single selector tied to a single attribute is inherently fragile.
Multiple Independent Selectors
webSlinger doesn't rely on a single selector. For every element you interact with, the system generates multiple independent selectors that each identify the same element through different characteristics. For example, the same button might be identified by:
- Its unique
idattribute - A combination of its label text and element type
- Its position relative to surrounding elements
- A distinctive combination of its attributes
All of these selectors are validated during recording and stored in the session map. They're all proven to work, not theoretical.
Consensus During Execution
When your automation script runs, webSlinger doesn't try one selector and fall back to another if it fails. Instead, all selectors are evaluated simultaneously and the system uses consensus to identify the right element. If the website made minor changes and one or two selectors no longer match, the remaining selectors still agree on the correct element.
What This Means for You
Scripts Last Longer
Minor website updates that break traditional automation scripts won't affect yours. Multiple selectors provide natural resilience.
Less Maintenance
You spend less time re-recording scripts because they tolerate changes that would be fatal to single-selector approaches.
Automatic Shortcuts
Not Every Click Matters
When you record a session, you might click through a menu, then a submenu, then a category filter to reach a specific page. But often that page has a direct URL that would get you there in one step. Clicking through three navigation layers is unnecessary if the destination has a bookmarkable address.
webSlinger detects this automatically.
Anchor States
The third tab in webSlinger's recording architecture, the copy tab, quietly tests whether each page you visit can be reached by navigating directly to its URL. When it can, webSlinger marks that page as an anchor state.
amazon.com/dp/B00ABC123XYZ by clicking through search results and category filters. The copy tab navigates directly to that URL and confirms it reaches the same page. webSlinger marks it as an anchor, so your automation script goes straight there instead of retracing all your clicks.
Not every page qualifies. Some web applications maintain state in ways that can't be reproduced through the URL alone. When the copy tab can't reproduce a page state through direct navigation, webSlinger preserves the full action sequence needed to reach it.
The Result: Leaner Scripts
- Fewer steps: Automation scripts skip unnecessary navigation when a direct URL works
- Faster execution: Direct navigation is faster than simulating multiple clicks
- More reliable: URLs are more stable than chains of selectors through navigation menus
- Clearer code: Generated scripts show the intent (go to this page) rather than the manual path you happened to take
Reading the Overlay
What You See During Recording
While you record, webSlinger displays a compact overlay in the corner of the main tab. This overlay gives you real-time feedback about what's happening across all three tabs.
Stability Indicators
The three circles at the bottom of the overlay show whether each tab has settled into a stable state:
- Yellow: This tab's page is still loading or changing.
- Green: This tab's page has stabilized. webSlinger is ready to process actions.
The State Grid
Above the stability circles, you'll see a 3x3 grid of colored blocks. Each block represents a fingerprint of one tab's current page state, computed by one of three independent monitoring algorithms.
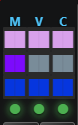
Layout:
- Columns: M (Main tab), V (Validation tab), C (Copy tab)
- Rows 1-3: Three independent state fingerprints per tab
- Row 4: Stability indicators (the colored circles)
What the Grid Tells You
- Matching colors across a row: The tabs are in sync with respect to that algorithm. This is common when all tabs are looking at the same page.
- Different colors across a row: The tabs are on different pages, or one tab hasn't caught up yet. This is normal during recording. The validation tab might still be processing your previous action while you've already moved on.
- Mixed stability indicators: Some tabs are stable (green) while others are still loading (yellow). Navigation is most reliable when you wait for the main-tab and validation-tab indicators to turn green before performing the next action. The stability of the copy tab has no impact on validation.