keyBunker Setup Guide
What is keyBunker?
keyBunker is a local credential vault that works alongside the keyCocoon browser extension. Together they handle login authentication during automation — without ever exposing your passwords or 2FA secrets to webSlinger's servers.
You need keyBunker whenever your automation involves logging into a website.
Zero-Knowledge Security
Your credentials are encrypted and stored locally. During automation, webSlinger orchestrates navigation while keyCocoon handles credentials privately — the two sides communicate only through domain-based requests, never through actual credential values.
Your session maps and generated scripts contain no credentials.
What This Guide Covers
- First Launch — setting your master password
- Adding Passwords — storing login credentials for a site
- Adding TOTP (2FA) — storing 2FA secrets for automatic code generation
- How It Works — what happens during automation
First Launch
Opening keyBunker
- Open the Start Menu and type KeyBunker
- Click KeyBunker in the search results
- The keyBunker password dialog opens
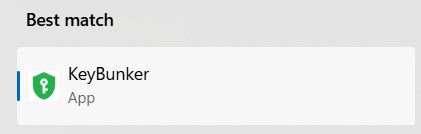
KeyBunker appears as a Best Match when you type its name in the Start Menu
Setting Your Master Password
The same password dialog handles both first-time setup and all subsequent unlocks. On first launch the prompt reads "No vault exists. Enter new password:" — the password you enter becomes your master password and creates the vault. On subsequent launches the prompt reads "Enter keyBunker password:".
- Enter your password in the dialog (on first launch, this becomes your master password)
- Click OK
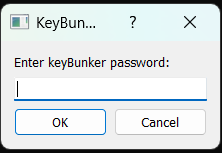
On first launch the prompt says "No vault exists. Enter new password:" — on subsequent launches it says "Enter keyBunker password:"
Adding Passwords
Add a Website Credential
Each entry stores the login credentials for one website. keyCocoon matches entries to sites by domain.
- Click New Account
- Enter an Account Name — a label for this entry, like GitHub or Amazon Work
- Enter your Username or email address
- Enter your Password
- Enter the URL — the site's login URL or just its domain, like
github.com - Click Save
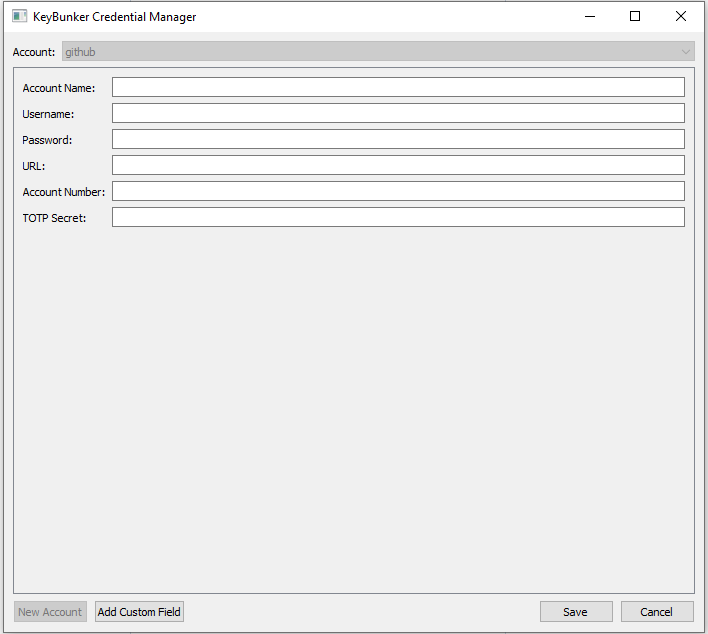
The KeyBunker Credential Manager. Account Name, Username, Password, and URL are the key fields for basic logins.
Domain Matching
keyCocoon matches your entry to a login page by extracting the root domain from both the stored URL and the current page — subdomains are ignored. So accounts.google.com and mail.google.com both match a stored URL of google.com. Enter just the root domain in the URL field:
| Login page URL | Enter as URL |
|---|---|
https://github.com/login |
github.com |
https://www.amazon.com/ap/signin |
amazon.com |
https://accounts.google.com/signin/... |
google.com |
https://secure.bankofamerica.com/login/... |
bankofamerica.com |
Testing Your Credential
You can test a credential on any login page — you don't need to be in a formal recording session. Activate webSlinger on the site and follow this sequence:
- Activate webSlinger and navigate to the site's login page
- Start a keyCocoon authentication session — click the keyCocoon icon in the browser toolbar, or the keyCocoon status icon on the webSlinger overlay, then enter your session duration and master password.
Shortcut: If you skip this step, the master password dialog will appear automatically when you click Authenticate with keyCocoon in step 7.
- Toggle the input overlay on
- Right-click the username field and type your username
- Set the Press Enter option to match your login form's layout:
- Checked — for two-page logins where entering the username submits and navigates to a separate password page
- Unchecked — for single-page logins where both username and password fields are visible at once, so the form doesn't submit before the password is filled
- Click Record
- Right-click the password field (highlighted red in the overlay)
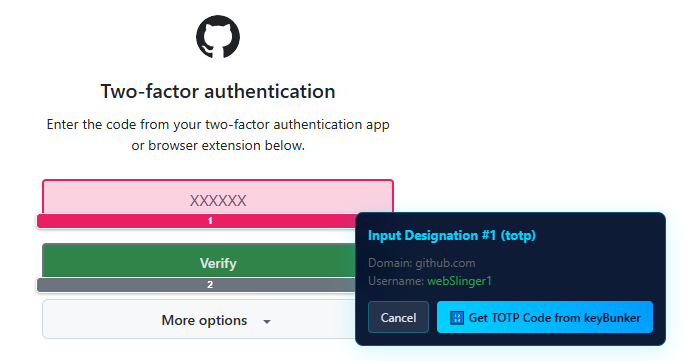
- Click Authenticate with keyCocoon — webSlinger sends the current domain and the username you entered to keyCocoon, which retrieves the matching credential from keyBunker
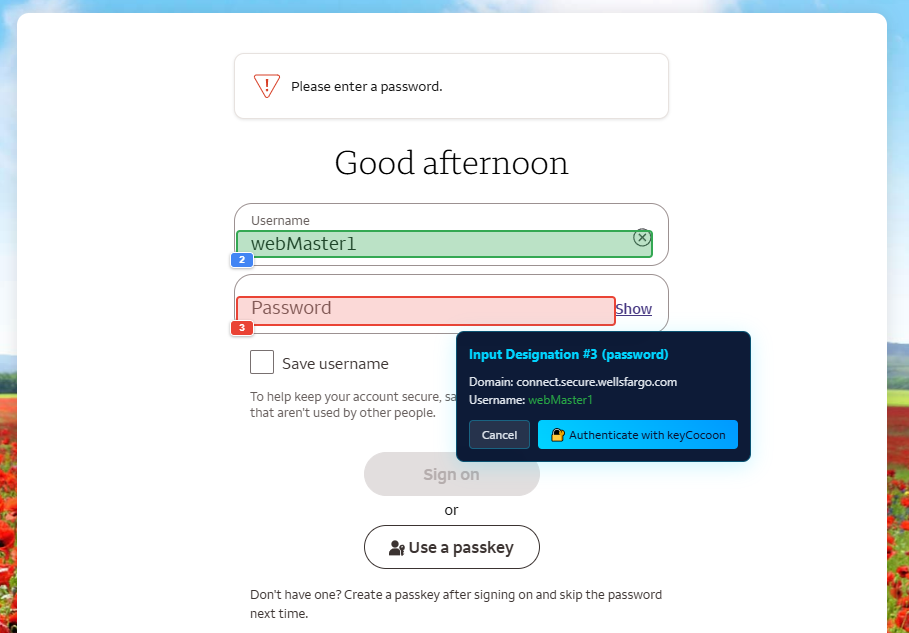
After typing the username, right-clicking the password field (red) shows this menu. The domain and username confirm which credential keyCocoon will look up.
Watch the validation log for the result — there is no separate confirmation dialog:
- Green message — credential found, password entered, login succeeded
- Red message — credential not found, or login failed
Adding TOTP (2FA)
What is TOTP?
TOTP (Time-based One-Time Password) is the 6-digit code that changes every 30 seconds — the kind generated by apps like Google Authenticator or Authy. Sites use it as a second factor on top of your password.
keyBunker generates these codes automatically during automation, so your scripts can log in to 2FA-protected accounts without any manual intervention.
The TOTP Secret Key
Every TOTP code is generated from a secret key — a string that looks like JBSWY3DPEHPK3PXP. The website gives you this key exactly once, when you first set up 2FA. keyBunker needs this key to generate matching codes.
The same key must be entered into both your phone's authenticator app and keyBunker — they generate identical codes from the same secret.
Grabbing the Key
Follow the site's normal instructions for setting up an authenticator app. When you reach the QR code screen, the secret key is always available nearby — look for a link or button labeled something like "Can't scan the QR code?", "Enter this text code", or "Copy Key". Grab it on your way through.
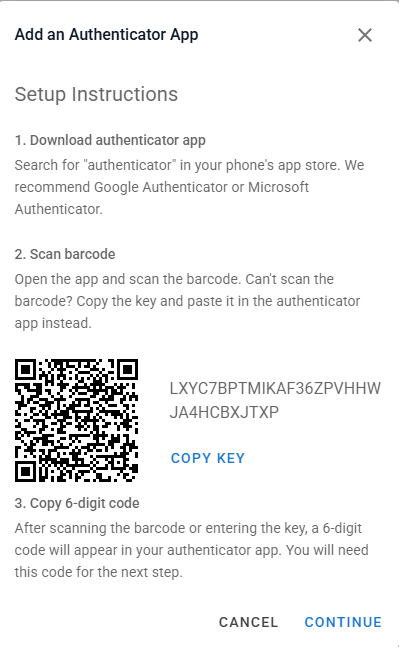
The key is always available alongside the QR code — sometimes shown automatically, sometimes one click away
JBSW Y3DP EHPK 3PXP). Remove the spaces before entering it in keyBunker.
Entering the Key in keyBunker
While the QR code screen is still open, enter the key into keyBunker before scanning with your phone — once you scan, the authenticator app immediately prompts for additional steps and you may lose track of the key.
- Open keyBunker and create or open the credential entry for this site
- Paste the secret key into the TOTP Secret field and click Save
- Now scan the QR code with your authenticator app and complete enrollment normally on your phone
Paste the key into the TOTP Secret field before scanning the QR code with your phone
Once enrollment is complete, you can test that keyCocoon can fill in the code automatically — see Testing Your Credential on the previous page.
How It Works
During Automation
When you record a session that includes a login, the generated script includes the credential and TOTP actions you recorded. When the script runs, these steps execute automatically:
- The script navigates to the login page and enters the username
- The script sends a credential request to keyCocoon — containing only the domain and username
- keyCocoon retrieves the matching password from keyBunker and injects it directly into the form
- If the site has a TOTP step, the script sends a TOTP request and keyCocoon fills the current 6-digit code generated from the secret stored in keyBunker
- The form is submitted and automation continues
TOTP codes are filled the same way as passwords — the script requests the code, keyCocoon retrieves it from keyBunker
Authentication Sessions
keyCocoon will not serve credentials unless there is an active authentication session. Before running an automation script that involves login, you need to start a session:
- Click the keyCocoon icon in the browser toolbar (or the keyCocoon status icon on the webSlinger overlay)
- Enter your session duration — how long keyCocoon will remain authorized to serve credentials
- Enter your master password
The session expires after the set period. This ensures credentials are never accessible indefinitely — even if your browser is left open, keyCocoon stops serving credentials once the session ends.
What webSlinger Never Sees
webSlinger handles navigation — clicks, page transitions, form interactions. Credential values travel a completely separate path: keyBunker to keyCocoon to the form, never through webSlinger.
Your session maps and generated scripts contain no credentials.
Troubleshooting
Check that the root domain in keyBunker's URL field matches the login page. Matching is based on root domain only (e.g.,
amazon.com) — subdomains and paths are ignored. Also confirm the username stored in keyBunker matches what you entered in the username field.
Verify your computer's system clock is accurate (Windows > Settings > Time & Language > Sync now). Also confirm the code from keyBunker matches your phone's authenticator app — if not, re-enter the secret key.
keyCocoon sessions are timed. If automation fails partway through a login, the session may have expired. Start a new session with a longer duration before re-running the script.
keyBunker is only installed when keyCocoon is detected during webSlinger setup. Run the installer again with keyCocoon active in Chrome.
Make sure you're entering the password exactly as you created it (case-sensitive). There is no recovery option if the password is forgotten — a new vault would need to be created and all credentials re-entered.